
TPM Spoofing Solution
TPM 2.0 identifier management methods. Staff will advise if TPM identifier changes are needed for your configuration.
Overview#
Some configurations may require TPM to be enabled. Staff will advise if this applies to you. There are several ways to change your TPM identifier. The methods that apply to you depend on your motherboard and CPU.
The following conditions allow the TPM serial to change after a BIOS flash: GIGABYTE, MSI, and ASRock motherboards on an Intel CPU. AM4 motherboards with one of the newest BIOS patches that fix certain TPM security issues. To check if this applies to you: enable TPM, then download and run the TPM checker as admin, and send a screenshot of the output in your ticket.


BIOS Flash Method#
Follow the Flashing BIOS guide. If the SHA256 value (shown in the TPM checker screenshot above) changes after flashing, your TPM has been spoofed.
Intel users: if available, use your motherboard's BIOS Flashback button - a physical button usually near your USB ports or directly on the motherboard. This gives the highest chance of a successful flash. Make sure the BIOS version you flash to is compatible with your CPU.
PowerShell Method (AMD)#
If you are AMD and do not have the BIOS flash method available (e.g. AM5 boards), try this method.
This method has a low success rate. If TPM changes do not persist after this, the method did not work for you and you will need a TPM chip.
PowerShell Procedure
3 Clear Steps • Click checkmark as you complete
Open a PowerShell window as Administrator and run the following commands one by one: Clear-TPM, then Disable-TpmAutoProvisioning.
Restart your PC.
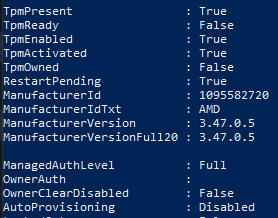
To verify the method worked, open PowerShell as admin and run: Get-Tpm
Linux TPM Clear Method#
This method may not work on all AMD configurations. On Intel it generally works for 11th gen and newer.
AMD users: if the PowerShell method fails, you may need a physical TPM chip. Ask in a ticket for guidance on which one to buy for your motherboard. This method will not work for Intel CPUs below the 11th gen.
Before continuing, save your current TPM serials using the TPM checker and send the screenshot in your ticket.
Step 1 - Prepare the USB
3 Clear Steps • Click checkmark as you complete
Plug in a USB drive.
Step 2 - Create the Bootable USB
5 Clear Steps • Click checkmark as you complete
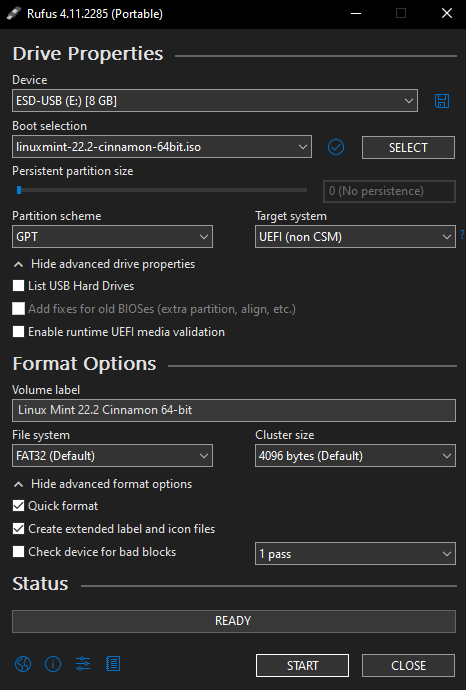
Open Rufus.
Select the Linux Mint ISO.
Select your USB drive.
Change Partition Scheme from MBR to GPT.
It should match the image below. Start the process and wait for it to finish.
Step 3 - Boot into Linux Mint
5 Clear Steps • Click checkmark as you complete
Restart your PC and enter BIOS/Boot Manager.
Boot from the USB and select the first option at the top of the menu.
Once in Linux Mint, open Terminal and run: sudo su
Add the mint user to sudo: usermod -aG sudo mint
Restart the PC.
Step 4 - Clear TPM in BIOS
4 Clear Steps • Click checkmark as you complete
Enter BIOS.
Go to Trusted Computing (usually under the Advanced tab).
Set "Pending Operation" to TPM Clear.
Save and exit with the USB drive as #1 in your boot priority.
You must boot directly into Linux Mint after clearing TPM. If Windows boots first, you must repeat the TPM clear step.
Step 5 - Run TPM Commands
2 Clear Steps • Click checkmark as you complete
Open Terminal, run sudo su.
Copy all 7 commands, paste them into the terminal, and press Enter.
sudo apt update
sudo apt install -y tpm2-tools openssl
sudo tpm2_clear
RAND=$(openssl rand -hex 32)
sudo tpm2_createprimary -C o -g sha256 -G rsa -q $RAND -c primary.ctx
sudo tpm2_readpublic -c primary.ctx -f pem -o key.pem
sudo tpm2_evictcontrol -C o -c primary.ctx 0x81010001
The last line should output "Persisted". If you see errors, do not continue - ask in a ticket.
Step 6 - Finish
4 Clear Steps • Click checkmark as you complete
Shut down the PC.
Unplug the USB.
Power on and boot into Windows.
Plug the USB back in, format it, then unplug it.
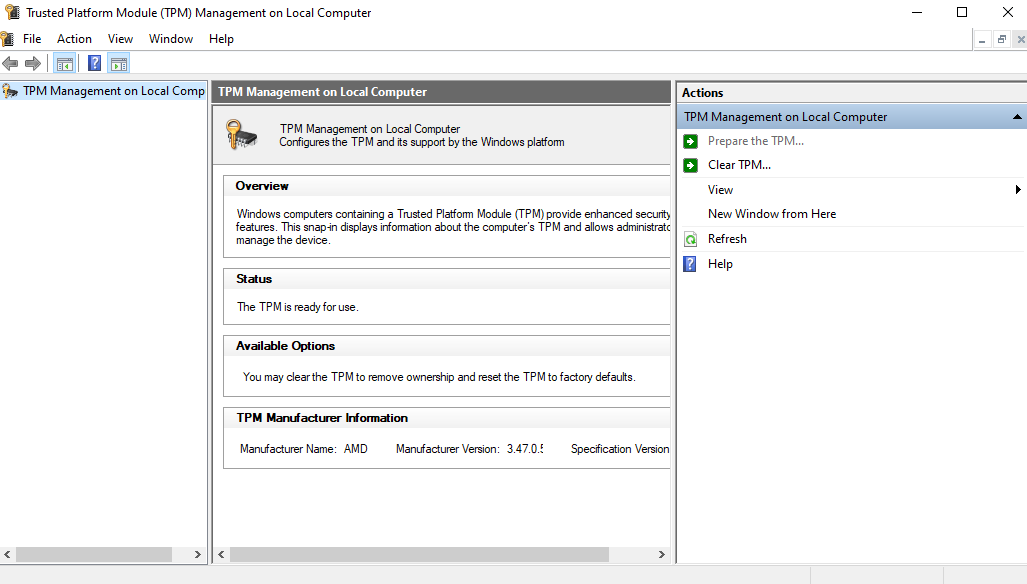
Check if your TPM serial has changed using the TPM checker and send the new screenshot in your ticket. Then open tpm.msc and verify the Status reads "Ready for use". If the status matches the image above, your TPM is spoofed.